图
图是一种非线性数据结构。它的表示有以下几种:
- 邻接矩阵
- 邻接表
- 关联矩阵
邻接矩阵
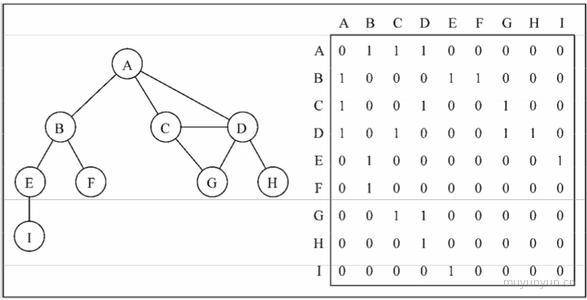
邻接矩阵是表示图的常用方法, 用二维数组来表示, 数组的每个下标对应每个点。当两个点有连线则二维数组的值为 1, 否则二维数组的值为 0。但是这种表示方法会照成存储空间的浪费(因存在大量 0)。
邻接表
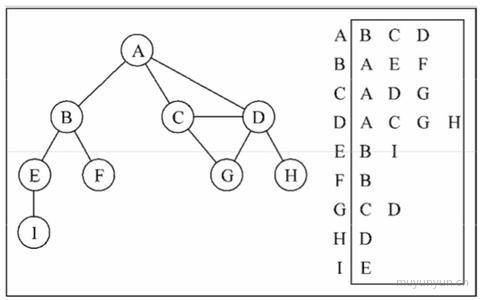
如下图: 左侧为存储的顶点, 右侧为与之想对应的点, 后文会采用这种方式实现图。
关联矩阵
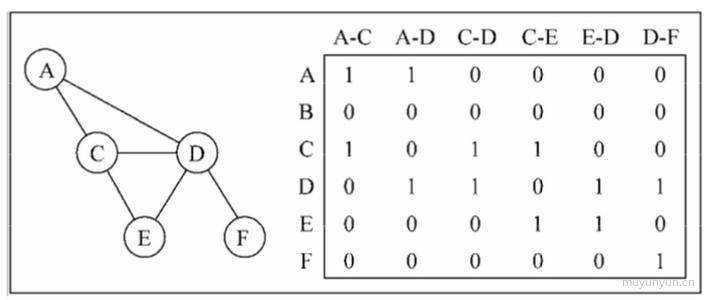
行表示点, 列表示边。
function Graph() {this.topPointArr = [] // 存储顶点, 笔者认为图的顶点是不会重复的this.edgeMap = new Map() // 存储边}// 往图里添加顶点Graph.prototype.addTopPoint = function(point) {this.topPointArr.push(point)this.edgeMap.set(point, [])}// 往指定的点添加相邻的点Graph.prototype.addEdge = function(point1, point2) {this.edgeMap.get(point1).push(point2)this.edgeMap.get(point2).push(point1) // 这里默认没有方向, 所以两个点互相指向}// 将图给打印出来Graph.prototype.log = function() {let str = ''let neighbourfor (let i of this.topPointArr) {str += i + ' -> 'neighbour = this.edgeMap.get(i).join(' ')str += neighbour + '\n'}return str}
按之前邻接表的图示, 跑如下测试用例:
var graph = new Graph()var topArr = ['A', 'B', 'C', 'D', 'E', 'F', 'G', 'H', 'I']for (let i of topArr) {graph.addTopPoint(i)}graph.addEdge('A', 'B')graph.addEdge('A', 'C')graph.addEdge('A', 'D')graph.addEdge('B', 'E')graph.addEdge('B', 'F')graph.addEdge('C', 'D')graph.addEdge('C', 'G')graph.addEdge('D', 'G')graph.addEdge('D', 'H')graph.addEdge('E', 'I')
使用自定义打印函数 graph.log(), 打印结果如下, 结果符合预期
A -> B C DB -> A E FC -> A D GD -> A C G HE -> B IF -> BG -> C DH -> DI -> E
广度优先遍历(BFS)
顾名思义, 广度优先即横向优先, 英文名为 breadth first search(BFS), 它示意图如下:
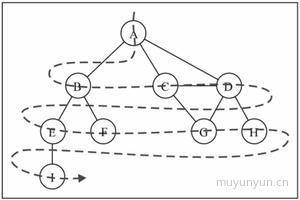
思想: 用到了队列的思想。思路如下: (标白: 未发现; 标灰: 已找寻)
- 创建队列 u, 将标灰的顶点插入队列;
- 若队列 u 不为空;
- 从队列取出值 v;
- 将 v 的相邻节点标灰并插入队列 u;
代码中用到队列相关的方法可参考 队列
Queue实现
function Queue() {this.items = []}Queue.prototype.push = function(item) {this.items.push(item)}Queue.prototype.shift = function() {return this.items.shift()}Queue.prototype.isEmpty = function() {return this.items.length === 0}Queue.prototype.size = function() {return this.items.length}Queue.prototype.clear = function() {this.items = []}
Graph.prototype.bfs = function(v, callback) {const obj = {}for (let i of this.topPointArr) { // 初始化颜色obj[i] = 'white'}const queue = new Queue()obj[v] = 'gray'queue.push(v)let shiftQueue, neighbourwhile (!queue.isEmpty()) {shiftQueue = queue.shift()neighbour = this.edgeMap.get(shiftQueue)for (let i of neighbour) {if (obj[i] === 'white') {obj[i] = 'gray'queue.push(i)}}if (callback) {callback(shiftQueue)}}}
检验完成的 bfs 函数, 进行如下调用,
graph.bfs('A', (shiftQueue) => {console.log(shiftQueue)})
打印结果为 A B C D E F G H I, 符合预期。
广度优先遍历求最短路径
在上述 bfs 函数实现的基础上, 加入两个变量分别存储距离以及最短路径上先前的点
Graph.prototype.BFS = function(v) {const obj = {}const d = {} // 新加入的变量存储距离const prev = {} // 新加入的变量存储最短路径上先前的点for (let i of this.topPointArr) { // 初始化颜色obj[i] = 'white'd[i] = 0prev[i] = null}const queue = new Queue()obj[v] = 'gray'queue.push(v)let shiftQueue, neighbourwhile (!queue.isEmpty()) {shiftQueue = queue.shift()neighbour = this.edgeMap.get(shiftQueue)for (let i of neighbour) {if (obj[i] === 'white') {obj[i] = 'gray'queue.push(i)d[i] = d[shiftQueue] + 1 // 这个地方卡主了~~~, 思路: 第二行的点距离第一行的点相差为 1, 第三行的点距离第二行的点相差为 1, 以此类推。prev[i] = shiftQueue}}}return {distance: d,prev: prev}}
调用 graph.BFS('A'), 得如下结果:
{distance: { A: 0, B: 1, C: 1, D: 1, E: 2, F: 2, G: 2, H: 2, I: 3 }prev: { A: null, B: "A", C: "A", D: "A", E: "B", F: "B", G: "C", H: "D", I: "E" }}
接下来我们处理上述返回的 prev 将最短路径打印出来:
Graph.prototype.logMinPath = function(v) {const { distance, prev } = this.BFS(v)let path = ''const arr = []Object.keys(distance).map(r => {path = rwhile (prev[r]) { // 终止条件为 prev 中值为 null 时path = prev[r] + ' - ' + pathr = prev[r]}arr.push(path)})return arr.join('\n')}
调用 graph.logMinPath('A'), 打印结果如下:
AA - BA - CA - DA - B - EA - B - FA - C - GA - D - HA - B - E - I
深度优先遍历(DFS)
深度优先遍历用到了栈的思想。英文名为 depth first search(DFS), 其示意图如下:
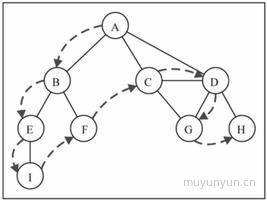
代码实现如下:
Graph.prototype.dfs = function (v, callback) {const obj = {}for (let i of this.topPointArr) { // 初始化颜色obj[i] = 'white'}let neighbourconst that = thisconst find = function (v, color, cb) {color[v] = 'gred'if (cb) {cb(v)}neighbour = that.edgeMap.get(v)for (let i of neighbour) {if (color[i] === 'white') {find(i, color, cb)}}}find(v, obj, callback)}
进行如下函数调用
graph.dfs('A', (shiftQueue) => {console.log(shiftQueue) // 打印结果: A B E I F C D G H})