Code Spliting
在 16.6 版本之前,code-spliting 通常是由第三方库来完成的,比如 react-loadble(核心思路为: 高阶组件 + webpack dynamic import), 在 16.6 版本中提供了 Suspense 和 lazy 这两个钩子, 因此在之后的版本中便可以使用其来实现 Code Spliting。
目前阶段, 服务端渲染中的
code-spliting还是得使用react-loadable, 可查阅 React.lazy, 暂时先不探讨原因。
Code Spliting 在 React 中的使用方法是在 Suspense 组件中使用 <LazyComponent> 组件:
import { Suspense, lazy } from 'react'const DemoA = lazy(() => import('./demo/a'))const DemoB = lazy(() => import('./demo/b'))<Suspense><NavLink to="/demoA">DemoA</NavLink><NavLink to="/demoB">DemoB</NavLink><Router><DemoA path="/demoA" /><DemoB path="/demoB" /></Router></Suspense>
源码中 lazy 将传入的参数封装成一个 LazyComponent
function lazy(ctor) {return {$$typeof: REACT_LAZY_TYPE, // 相关类型_ctor: ctor,_status: -1, // dynamic import 的状态_result: null, // 存放加载文件的资源};}
观察 readLazyComponentType 后可以发现 dynamic import 本身类似 Promise 的执行机制, 也具有 Pending、Resolved、Rejected 三种状态, 这就比较好理解为什么 LazyComponent 组件需要放在 Suspense 中执行了(Suspense 中提供了相关的捕获机制, 下文会进行模拟实现`), 相关源码如下:
function readLazyComponentType(lazyComponent) {const status = lazyComponent._status;const result = lazyComponent._result;switch (status) {case Resolved: { // Resolve 时,呈现相应资源const Component = result;return Component;}case Rejected: { // Rejected 时,throw 相应 errorconst error = result;throw error;}case Pending: { // Pending 时, throw 相应 thenableconst thenable = result;throw thenable;}default: { // 第一次执行走这里lazyComponent._status = Pending;const ctor = lazyComponent._ctor;const thenable = ctor(); // 可以看到和 Promise 类似的机制thenable.then(moduleObject => {if (lazyComponent._status === Pending) {const defaultExport = moduleObject.default;lazyComponent._status = Resolved;lazyComponent._result = defaultExport;}},error => {if (lazyComponent._status === Pending) {lazyComponent._status = Rejected;lazyComponent._result = error;}},);// Handle synchronous thenables.switch (lazyComponent._status) {case Resolved:return lazyComponent._result;case Rejected:throw lazyComponent._result;}lazyComponent._result = thenable;throw thenable;}}}
Async Data Fetching
为了解决获取的数据在不同时刻进行展现的问题(在 suspenseDemo 中有相应演示), Suspense 给出了解决方案。
下面放两段代码,可以从中直观地感受在 Suspense 中使用 Async Data Fetching 带来的便利。
- 一般进行数据获取的代码如下:
export default class Demo extends Component {state = {data: null,};componentDidMount() {fetchAPI(`/api/demo/${this.props.id}`).then((data) => {this.setState({ data });});}render() {const { data } = this.state;if (data == null) {return <Spinner />;}const { name } = data;return (<div>{name}</div>);}}
- 在
Suspense中进行数据获取的代码如下:
const resource = unstable_createResource((id) => {return fetchAPI(`/api/demo`)})function Demo {const data = resource.read(this.props.id)const { name } = data;return (<div>{name}</div>);}
可以看到在 Suspense 中进行数据获取的代码量相比正常的进行数据获取的代码少了将近一半!少了哪些地方呢?
- 减少了
loading状态的维护(在最外层的 Suspense 中统一维护子组件的 loading) - 减少了不必要的生命周期的书写
总结: 如何在 Suspense 中使用 Data Fetching
当前 Suspense 的使用分为三个部分:
第一步: 用 Suspens 组件包裹子组件
import { Suspense } from 'react'<Suspense fallback={<Loading />}><ChildComponent></Suspense>
第二步: 在子组件中使用 unstable_createResource:
import { unstable_createResource } from 'react-cache'const resource = unstable_createResource((id) => {return fetch(`/demo/${id}`)})
第三步: 在 Component 中使用第一步创建的 resource:
const data = resource.read('demo')
相关思路解读
来看下源码中 unstable_createResource 的部分会比较清晰:
export function unstable_createResource(fetch, maybeHashInput) {const resource = {read(input) {...const result = accessResult(resource, fetch, input, key);switch (result.status) {case Pending: {const suspender = result.value;throw suspender;}case Resolved: {const value = result.value;return value;}case Rejected: {const error = result.value;throw error;}default:// Should be unreachablereturn (undefined: any);}},};return resource;}
结合该部分源码, 进行如下推测:
- 第一次请求没有缓存, 子组件
throw一个thenable对象,Suspense组件内的componentDidCatch捕获之, 此时展示Loading组件; - 当
Promise态的对象变为完成态后, 页面刷新此时resource.read()获取到相应完成态的值; - 之后如果相同参数的请求, 则走
LRU缓存算法, 跳过Loading组件返回结果(缓存算法见后记);
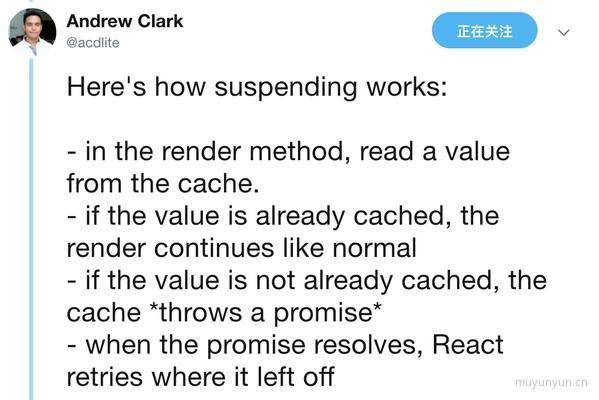
官方作者是说法如下:

所以说法大致相同, 下面实现一个简单版的 Suspense:
class Suspense extends React.Component {state = {promise: null}componentDidCatch(e) {if (e instanceof Promise) {this.setState({promise: e}, () => {e.then(() => {this.setState({promise: null})})})}}render() {const { fallback, children } = this.propsconst { promise } = this.statereturn <>{ promise ? fallback : children }</>}}
进行如下调用
<Suspense fallback={<div>loading...</div>}><PromiseThrower /></Suspense>let cache = "";let returnData = cache;const fetch = () =>new Promise(resolve => {setTimeout(() => {resolve("数据加载完毕");}, 2000);});class PromiseThrower extends React.Component {getData = () => {const getData = fetch();getData.then(data => {returnData = data;});if (returnData === cache) {throw getData;}return returnData;};render() {return <>{this.getData()}</>;}}

效果调试可以点击这里, 在 16.6 版本之后, componentDidCatch 只能捕获 commit phase 的异常。所以在 16.6 版本之后实现的 <PromiseThrower> 又有一些差异(即将 throw thenable 移到 componentDidMount 中进行)。
ConcurrentMode + Suspense
当网速足够快, 数据立马就获取到了,此时页面存在的 Loading 按钮就显得有些多余了。(在 suspenseDemo 中有相应演示), Suspense 在 Concurrent Mode 下给出了相应的解决方案, 其提供了 maxDuration 参数。用法如下:
<Suspense maxDuration={500} fallback={<Loading />}>...</Suspense>
该 Demo 的效果为当获取数据的时间大于(是否包含等于还没确认) 500 毫秒, 显示自定义的 <Loading /> 组件, 当获取数据的时间小于 500 毫秒, 略过 <Loading> 组件直接展示用户的数据。相关源码。
需要注意的是 maxDuration 属性只有在 Concurrent Mode 下才生效, 可参考源码中的注释。在 Sync 模式下, maxDuration 始终为 0。
后记: 缓存算法
LRU算法:Least Recently Used最近最少使用算法(根据时间);LFU算法:Least Frequently Used最近最少使用算法(根据次数);
若数据的长度限定是 3, 访问顺序为 set(2,2),set(1,1),get(2),get(1),get(2),set(3,3),set(4,4), 则根据 LRU 算法删除的是 (1, 1), 根据 LFU 算法删除的是 (3, 3)。
react-cache 采用的是 LRU 算法。
相关资料
- suspenseDemo: 文字相关案例都集成在该 demo 中
- Releasing Suspense:
Suspense开发进度 - the suspense is killing redux