MVVM 框架
近年来前端一个明显的开发趋势就是架构从传统的 MVC 模式向 MVVM 模式迁移。在传统的 MVC 下,当前前端和后端发生数据交互后会刷新整个页面,从而导致比较差的用户体验。因此我们通过 Ajax 的方式和网关 REST API 作通讯,异步的刷新页面的某个区块,来优化和提升体验。
MVVM 框架基本概念

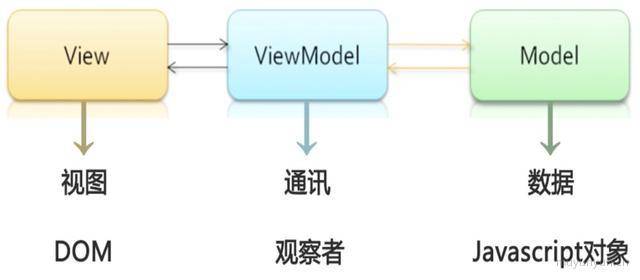
在 MVVM 框架中,View(视图) 和 Model(数据) 是不可以直接通讯的,在它们之间存在着 ViewModel 这个中间介充当着观察者的角色。当用户操作 View(视图),ViewModel 感知到变化,然后通知 Model 发生相应改变;反之当 Model(数据) 发生改变,ViewModel 也能感知到变化,使 View 作出相应更新。这个一来一回的过程就是我们所熟知的双向绑定。
MVVM 框架的应用场景
MVVM 框架的好处显而易见:当前端对数据进行操作的时候,可以通过 Ajax 请求对数据持久化,只需改变 dom 里需要改变的那部分数据内容,而不必刷新整个页面。特别是在移动端,刷新页面的代价太昂贵。虽然有些资源会被缓存,但是页面的 dom、css、js 都会被浏览器重新解析一遍,因此移动端页面通常会被做成 SPA 单页应用。由此在这基础上诞生了很多 MVVM 框架,比如 React.js、Vue.js、Angular.js 等等。
MVVM 框架的简单实现
贴士:这篇文章主要是针对 vue 的双向绑定实现,React 中其实并没有双向绑定这一说。
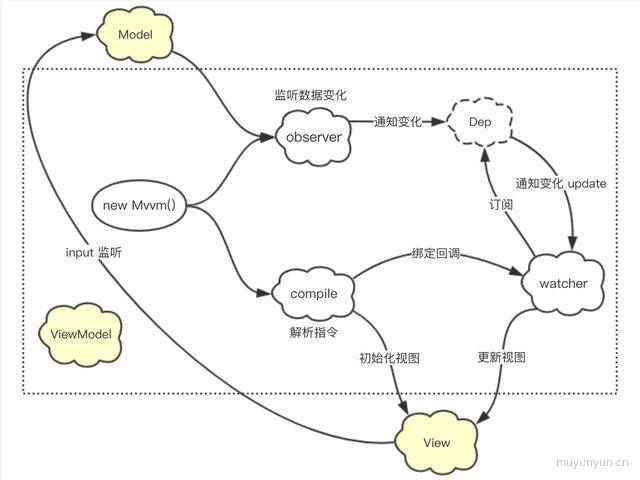
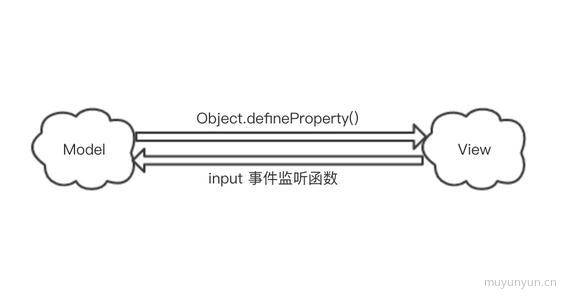
模拟 Vue 的双向绑定流,实现了一个简单的 MVVM 框架,从上图中可以看出虚线方形中就是之前提到的 ViewModel 中间介层,它充当着观察者的角色。另外可以发现双向绑定流中的 View 到 Model 其实是通过 input 的事件监听函数实现的,如果换成 React(单向绑定流) 的话,它在这一步交给状态管理工具(比如 Redux)来实现。另外双向绑定流中的 Model 到 View 其实各个 MVVM 框架实现的都是大同小异的,都用到的核心方法是 Object.defineProperty(),通过这个方法可以进行数据劫持,当数据发生变化时可以捕捉到相应变化,从而进行后续的处理。
Mvvm(入口文件) 的实现
一般会这样调用 Mvvm 框架
1
2
3
4
5
6
7
| const vm = new Mvvm({
el: '#app',
data: {
title: 'mvvm title',
name: 'mvvm name'
},
})
|
但是这样子的话,如果要得到 title 属性就要形如 vm.data.title 这样取得,为了让 vm.title 就能获得 title 属性,从而在 Mvvm 的 prototype 上加上一个代理方法,代码如下:
1
2
3
4
5
6
7
8
9
10
11
12
13
14
15
16
17
18
19
20
21
22
| function Mvvm (options) {
this.data = options.data
const self = this
Object.keys(this.data).forEach(key =>
self.proxyKeys(key)
)
}
Mvvm.prototype = {
proxyKeys: function(key) {
const self = this
Object.defineProperty(this, key, {
get: function () {
return self.data[key]
},
set: function (newValue) {
self.data[key] = newValue
}
})
}
}
|
实现了代理方法后,就步入主流程的实现
1
2
3
4
5
6
| function Mvvm (options) {
this.data = options.data
observe(this.data)
new Compile(options.el, this)
}
|
observer(观察者) 的实现
observer 的职责是监听 Model(JS 对象) 的变化,最核心的部分就是用到了 Object.defineProperty() 的 get 和 set 方法,当要获取 Model(JS 对象) 的值时,会自动调用 get 方法;当改动了 Model(JS 对象) 的值时,会自动调用 set 方法;从而实现了对数据的劫持,代码如下所示。
1
2
3
4
5
6
7
8
9
10
11
12
13
14
15
16
17
18
19
20
21
22
23
24
25
26
27
28
29
30
31
32
| let data = {
number: 0
}
observe(data)
data.number = 1
function observe(data) {
if (!data || typeof(data) !== 'object') {
return
}
const self = this
Object.keys(data).forEach(key =>
self.defineReactive(data, key, data[key])
)
}
function defineReactive(data, key, value) {
observe(value)
Object.defineProperty(data, key, {
get: function() {
return value
},
set: function(newValue) {
if (value !== newValue) {
console.log('值发生变化', 'newValue:' + newValue + ' ' + 'oldValue:' + value)
value = newValue
}
}
})
}
|
运行代码,可以看到控制台输出 值发生变化 newValue:1 oldValue:0,至此就完成了 observer 的逻辑。
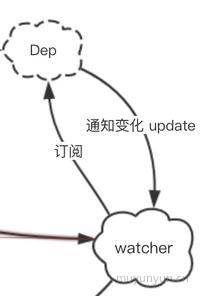
Dep(订阅者数组) 和 watcher(订阅者) 的关系
观测到变化后,我们总要通知给特定的人群,让他们做出相应的处理吧。为了更方便地理解,我们可以把订阅当成是订阅了一个微信公众号,当微信公众号的内容有更新时,那么它会把内容推送(update) 到订阅了它的人。
那么订阅了同个微信公众号的人有成千上万个,那么首先想到的就是要 new Array() 去存放这些人(html 节点)吧。于是就有了如下代码:
1
2
3
4
5
6
7
8
9
10
11
12
13
14
15
16
17
18
19
20
21
22
23
24
25
26
27
28
29
30
31
32
33
34
35
36
37
|
function Dep() {
this.subs = []
}
Dep.prototype = {
addSub: function(sub) {
this.subs.push(sub)
},
notify: function() {
this.subs.forEach(function(sub) {
sub.update()
})
}
}
function observe(data) {...}
function defineReactive(data, key, value) {
var dep = new Dep()
observe(value)
Object.defineProperty(data, key, {
get: function() {
if (Dep.target) {
dep.addSub(Dep.target)
}
return value
},
set: function(newValue) {
if (value !== newValue) {
console.log('值发生变化', 'newValue:' + newValue + ' ' + 'oldValue:' + value)
value = newValue
dep.notify()
}
}
})
}
|
初看代码也比较顺畅了,但可能会卡在 Dep.target 和 sub.update,由此自然而然地将目光移向 watcher,
1
2
3
4
5
6
7
8
9
10
11
12
13
14
15
16
17
18
19
20
21
22
23
24
25
26
27
|
function Watcher(vm, exp, cb) {
this.vm = vm
this.exp = exp
this.cb = cb
this.value = this.get()
}
Watcher.prototype = {
update: function() {
this.run()
},
run: function() {
if (value !== oldVal) {
this.cb.call(this.vm, value)
}
},
get: function() {
Dep.target = this
const value = this.vm.data[this.exp]
Dep.target = null
return value
}
}
|
从代码中可以看到当构造 Watcher 实例时,会调用 get() 方法,接着重点关注 const value = this.vm.data[this.exp] 这句,前面说了当要获取 Model(JS 对象) 的值时,会自动调用 Object.defineProperty 的 get 方法,也就是当执行完这句的时候,Dep.target 的值传进了 observer.js 中的 Object.defineProperty 的 get 方法中。同时也一目了然地在 Watcher.prototype 中发现了 update 方法,其作用即触发 compile 中绑定的回调来更新界面。至此解释了 Observer 中 Dep.target 和 sub.update 的由来。
来归纳下 Watcher 的作用,其充当了 observer 和 compile 的桥梁。
1 在自身实例化的过程中,往订阅器(dep) 中添加自己
2 当 model 发生变动,dep.notify() 通知时,其能调用自身的 update 函数,并触发 compile 绑定的回调函数实现视图更新
最后再来看下生成 Watcher 实例的 compile.js 文件。
compile(编译) 的实现
首先遍历解析的过程有多次操作 dom 节点,为提高性能和效率,会先将跟节点 el 转换成 fragment(文档碎片) 进行解析编译,解析完成,再将 fragment 添加回原来的真实 dom 节点中。代码如下:
1
2
3
4
5
6
7
8
9
10
11
12
13
14
15
16
17
18
19
20
21
22
23
24
25
26
| function Compile(el, vm) {
this.vm = vm
this.el = document.querySelector(el)
this.fragment = null
this.init()
}
Compile.prototype = {
init: function() {
if (this.el) {
this.fragment = this.nodeToFragment(this.el)
this.compileElement(this.fragment)
this.el.appendChild(this.fragment)
}
},
nodeToFragment: function(el) {
const fragment = document.createDocumentFragment()
let child = el.firstChild
while(child) {
fragment.appendChild(child)
child = el.firstChild
}
return fragment
},
compileElement: function(el) {...},
}
|
这个简单的 mvvm 框架在对 fragment 编译解析的过程中对 {{}} 文本元素、v-on:click 事件指令、v-model 指令三种类型进行了相应的处理。
1
2
3
4
5
6
7
8
9
10
11
12
13
14
15
16
17
18
19
20
21
22
23
24
25
26
27
28
29
30
31
32
33
34
35
36
37
38
| Compile.prototype = {
init: function() {
if (this.el) {
this.fragment = this.nodeToFragment(this.el)
this.compileElement(this.fragment)
this.el.appendChild(this.fragment)
}
},
nodeToFragment: function(el) {...},
compileElement: function(el) {...},
compileText: function (node, exp) {
const self = this
const initText = this.vm[exp]
this.updateText(node, initText)
new Watcher(this.vm, exp, function(value) {
self.updateText(node, value)
})
},
compileEvent: function (node, vm, exp, dir) {
const eventType = dir.split(':')[1]
const cb = vm.methods && vm.methods[exp]
if (eventType && cb) {
node.addEventListener(eventType, cb.bind(vm), false)
}
},
compileModel: function (node, vm, exp) {
let val = vm[exp]
const self = this
this.modelUpdater(node, val)
node.addEventListener('input', function (e) {
const newValue = e.target.value
self.vm[exp] = newValue
})
},
}
|
在上述代码的 compileTest 函数中看到了期盼已久的 Watcher 实例化,对 Watcher 作用模糊的朋友可以往上回顾下 Watcher 的作用。另外在 compileModel 函数中看到了本文最开始提到的双向绑定流中的 View 到 Model 是借助 input 监听事件变化实现的。
项目地址
本文记录了些阅读 mvvm 框架源码关于双向绑定的心得,并动手实践了一个简版的 mvvm 框架,不足之处在所难免,欢迎指正。
项目演示
项目地址