
本系列文章在实现一个 cpreact 的同时帮助大家理顺 React 框架的核心内容(JSX/虚拟DOM/组件/生命周期/diff算法/setState/PureComponent/HOC/…) 项目地址
生命周期
先来回顾 React 的生命周期,用流程图表示如下:
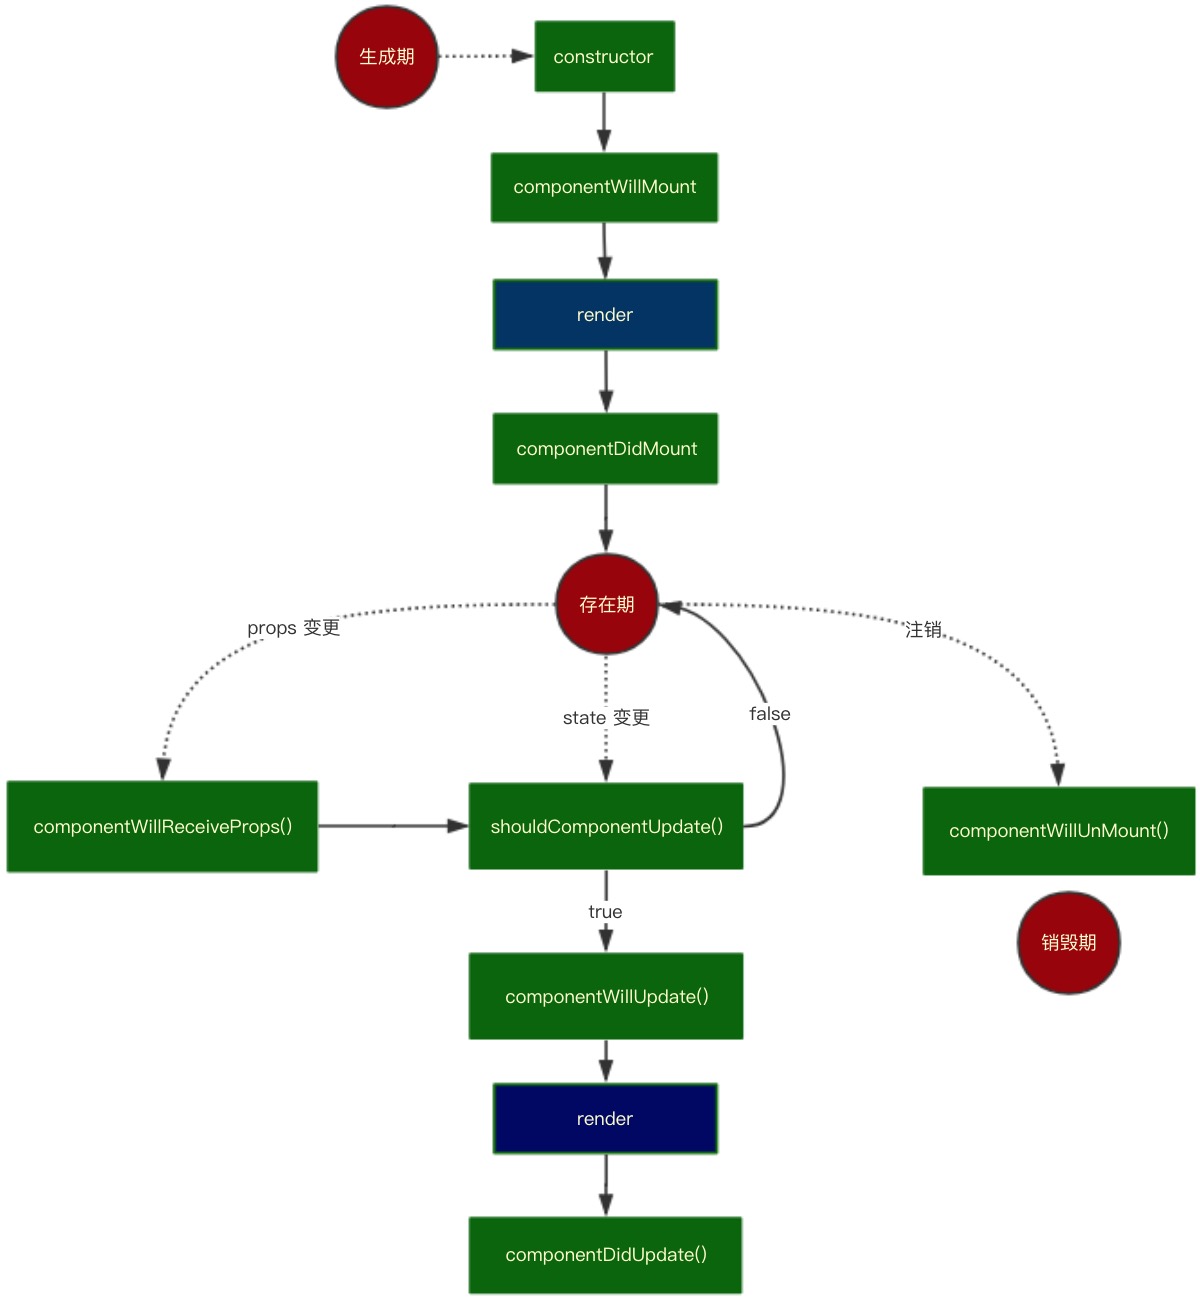
该流程图比较清晰地呈现了 react 的生命周期。其分为 3 个阶段 —— 生成期,存在期,销毁期。
因为生命周期钩子函数存在于自定义组件中,将之前 _render 函数作些调整如下:
1
2
3
4
5
6
7
8
9
10
|
function vdomToDom(vdom) {
if (_.isFunction(vdom.nodeName)) {
const component = createComponent(vdom)
setProps(component)
renderComponent(component)
return component.base
}
...
}
|
我们可以在 setProps 函数内(渲染前)加入 componentWillMount,componentWillReceiveProps 方法,setProps 函数如下:
1
2
3
4
5
6
7
| function setProps(component) {
if (component && component.componentWillMount) {
component.componentWillMount()
} else if (component.base && component.componentWillReceiveProps) {
component.componentWillReceiveProps(component.props)
}
}
|
而后我们在 renderComponent 函数内加入 componentDidMount、shouldComponentUpdate、componentWillUpdate、componentDidUpdate 方法
1
2
3
4
5
6
7
8
9
10
11
12
13
14
15
16
17
18
19
20
21
22
23
24
25
26
| function renderComponent(component) {
if (component.base && component.shouldComponentUpdate) {
const bool = component.shouldComponentUpdate(component.props, component.state)
if (!bool && bool !== undefined) {
return false
}
}
if (component.base && component.componentWillUpdate) {
component.componentWillUpdate()
}
const rendered = component.render()
const base = vdomToDom(rendered)
if (component.base && component.componentDidUpdate) {
component.componentDidUpdate()
} else if (component && component.componentDidMount) {
component.componentDidMount()
}
if (component.base && component.base.parentNode) {
component.base.parentNode.replaceChild(base, component.base)
}
component.base = base
}
|
测试生命周期
测试如下用例:
1
2
3
4
5
6
7
8
9
10
11
12
13
14
15
16
17
18
19
20
21
22
23
24
25
26
27
28
29
30
31
32
33
34
35
36
37
38
39
40
41
42
43
44
45
46
47
48
49
50
51
52
53
54
55
56
57
58
59
60
61
62
| class A extends Component {
componentWillReceiveProps(props) {
console.log('componentWillReceiveProps')
}
render() {
return (
<div>{this.props.count}</div>
)
}
}
class B extends Component {
constructor(props) {
super(props)
this.state = {
count: 1
}
}
componentWillMount() {
console.log('componentWillMount')
}
componentDidMount() {
console.log('componentDidMount')
}
shouldComponentUpdate(nextProps, nextState) {
console.log('shouldComponentUpdate', nextProps, nextState)
return true
}
componentWillUpdate() {
console.log('componentWillUpdate')
}
componentDidUpdate() {
console.log('componentDidUpdate')
}
click() {
this.setState({
count: ++this.state.count
})
}
render() {
console.log('render')
return (
<div>
<button onClick={this.click.bind(this)}>Click Me!</button>
<A count={this.state.count} />
</div>
)
}
}
ReactDOM.render(
<B />,
document.getElementById('root')
)
|
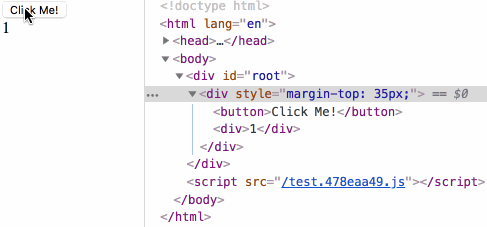
页面加载时输出结果如下:
1
2
3
| componentWillMount
render
componentDidMount
|
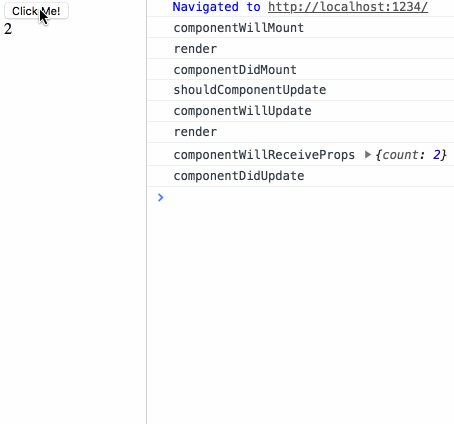
点击按钮时输出结果如下:
1
2
3
4
| shouldComponentUpdate
componentWillUpdate
render
componentDidUpdate
|
diff 的实现
在 react 中,diff 实现的思路是将新老 virtual dom 进行比较,将比较后的 patch(补丁)渲染到页面上,从而实现局部刷新;本文借鉴了 preact 和 simple-react 中的 diff 实现,总体思路是将旧的 dom 节点和新的 virtual dom 节点进行了比较,根据不同的比较类型(文本节点、非文本节点、自定义组件)调用相应的逻辑,从而实现页面的局部渲染。代码总体结构如下:
1
2
3
4
5
6
7
8
9
10
11
12
13
14
15
16
17
18
19
20
21
22
23
24
25
26
27
|
function diff(oldDom, newVdom) {
...
if (_.isString(newVdom)) {
return diffTextDom(oldDom, newVdom)
}
if (oldDom.nodeName.toLowerCase() !== newVdom.nodeName) {
diffNotTextDom(oldDom, newVdom)
}
if (_.isFunction(newVdom.nodeName)) {
return diffComponent(oldDom, newVdom)
}
diffAttribute(oldDom, newVdom)
if (newVdom.children.length > 0) {
diffChild(oldDom, newVdom)
}
return oldDom
}
|
下面根据不同比较类型实现相应逻辑。
对比文本节点
首先进行较为简单的文本节点的比较,代码如下:
1
2
3
4
5
6
7
8
9
10
11
12
13
14
15
|
function diffTextDom(oldDom, newVdom) {
let dom = oldDom
if (oldDom && oldDom.nodeType === 3) {
if (oldDom.textContent !== newVdom) {
oldDom.textContent = newVdom
}
} else {
dom = document.createTextNode(newVdom)
if (oldDom && oldDom.parentNode) {
oldDom.parentNode.replaceChild(dom, oldDom)
}
}
return dom
}
|
对比非文本节点
对比非文本节点,其思路为将同层级的旧节点替换为新节点,代码如下:
1
2
3
4
5
6
7
8
|
function diffNotTextDom(oldDom, newVdom) {
const newDom = document.createElement(newVdom.nodeName);
[...oldDom.childNodes].map(newDom.appendChild)
if (oldDom && oldDom.parentNode) {
oldDom.parentNode.replaceChild(oldDom, newDom)
}
}
|
对比自定义组件
对比自定义组件的思路为:如果新老组件不同,则直接将新组件替换老组件;如果新老组件相同,则将新组件的 props 赋到老组件上,然后再对获得新 props 前后的老组件做 diff 比较。代码如下:
1
2
3
4
5
6
7
8
9
10
11
|
function diffComponent(oldDom, newVdom) {
if (oldDom._component && (oldDom._component.constructor !== newVdom.nodeName)) {
const newDom = vdomToDom(newVdom)
oldDom._component.parentNode.insertBefore(newDom, oldDom._component)
oldDom._component.parentNode.removeChild(oldDom._component)
} else {
setProps(oldDom._component, newVdom.attributes)
renderComponent(oldDom._component)
}
}
|
遍历对比子节点
遍历对比子节点的策略有两个:一是只比较同层级的节点,二是给节点加上 key 属性。它们的目的都是降低空间复杂度。代码如下:
1
2
3
4
5
6
7
8
9
10
11
12
13
14
15
16
17
18
19
20
21
22
23
24
25
26
27
28
29
30
31
|
function diffChild(oldDom, newVdom) {
const keyed = {}
const children = []
const oldChildNodes = oldDom.childNodes
for (let i = 0; i < oldChildNodes.length; i++) {
if (oldChildNodes[i].key) {
keyed[oldChildNodes[i].key] = oldChildNodes[i]
} else {
children.push(oldChildNodes[i])
}
}
const newChildNodes = newVdom.children
let child
for (let i = 0; i < newChildNodes.length; i++) {
if (keyed[newChildNodes[i].key]) {
child = keyed[newChildNodes[i].key]
keyed[newChildNodes[i].key] = undefined
} else {
for (let j = 0; j < children.length; j++) {
if (isSameNodeType(children[i], newChildNodes[i])) {
child = children[i]
children[i] = undefined
break
}
}
}
diff(child, newChildNodes[i])
}
}
|
测试
在生命周期的小节中,componentWillReceiveProps 方法还未跑通,稍加修改 setProps 函数即可:
1
2
3
4
5
6
7
8
9
10
11
12
13
14
|
function setProps(component, attributes) {
if (attributes) {
component.props = attributes
}
if (component && component.base && component.componentWillReceiveProps) {
component.componentWillReceiveProps(component.props)
} else if (component && component.componentWillMount) {
component.componentWillMount()
}
}
|
来测试下生命周期小节中最后的测试用例:
鸣谢
Especially thank simple-react for the guidance function of this library. At the meantime,respect for preact and react